T4S
2013
Contact Information:
Box 1149, 109 St Andrew St, Mitchell, Ontario, N0K 1N0
519-348-8491
Fax 519-348-9519
TOLL FREE 1-877-738-4384
sales@tags4all.net |
|
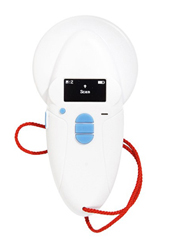
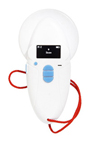
| T4S2013 - Tags4All Handheld
RFID Reader - With Memory - $349.00 |
T4S2013
Scanner Instructions
Configuring the Reader
After switching on the reader by pressing the On/Off button (1), you will see the message “Scan” with an arrow above it. Press button 2 to display “Memory”, hit button 4 to “Enable” or “Disable” the memory, or hit button 1 to cancel.
Press button 2 to display the “Language” menu, then button 4 to validate your selection. The reader is initially configured to operate in English.
To change the language, press button 3 and scroll down the languages until the one you wish to use (for example English) is displayed. You must then validate your choice (button 4).
The following message is displayed for 4 seconds:
English
OK
And then the reader displays:
SCAN
Once you have selected the language you can switch off the reader by holding down the “ON/Off” button.
Activating the Reader
When the reader is switched off, you can switch it on by pressing button 1. The display shows:
SCAN
Press the “Validate” button (4) to activate chip search for 20 seconds. The display show:
Reading
If a transponder is detected, the reader emits a “beep” and displays the identification number.
If no transponder is detected after 20 seconds, the reader emits 3 “beeps” and displays:
No transponder found!
Battery
The T4S2013 Scanner is powered by a Lithium/ion battery (included). It can be recharged by connecting the reader to a USB port. An indicator on the right of the display (6) indicates the battery charge level. When the charge is too low the reader displays the following message:
Low Battery
To Download Data to Excel
1. Plug scanner into computer with USB
cable (included).
2. Turn scanner on
3. Open “Scanner Terminal” from enclosed CD
(you should copy this program to your computer hard drive)
4. Go to File, and make sure Link to excel.exe is checked off. If it does not give the option to link to excel, make sure there is no checkmark beside “Link to…exe” It will then say, “No application linked to”. Say OK. Go to File, Link to an Application. On the window that comes up, press OK, then immediately open Microsoft Excel. A window should come up saying that Messages will be sent to excel.exe.
Click OK
5. Open Excel, if you have not already done so in step 4
6. In the Terminal window, go to Connection and select Connect
7. Make sure Caps Lock is on
8. Scan a microchip. The microchip number should show up
in the RealTrace Terminal and in Excel. Be sure that the
Terminal window is still open as well.
To Dump Data into Excel from the Reader Memory
1. Follow steps 1-7 as above.
2. Turn scanner on. When the screen says Press SCAN to send,
press the scan button and all the data on the reader will
be sent to Excel.
3. You can then erase the data or keep it on the scanner
using the prompts on the scanner screen. Make sure you confirm
if you want to erase the data or not.
Troubleshooting
1. Make sure you are connected to the correct
COM port for data transmission
2. If you only want the microchip number to transmit, make
sure that under Options, Display all the data is not checked
off.
3. If the numbers are coming up as grammatical figures,
make sure Caps Lock is on.
4. If it does not scan the numbers into the Terminal or
Excel, try disconnecting and reconnecting the scanner. On
the Terminal go to Connection. Select Disconnect, then go
back and select Connect.
|
|